Manage Organizations & Users
Last Modified: 07/26/2021
Note: Fields that contain an asterisk are mandatory and require user input.
Before you can distribute, upload, and manage applications on the EdgeXR platform, you need to create an organization. You can think of an organization as a group of users on the EdgeXR platform with associated applications and application deployment policies. When an organization is created, the EdgeXR platform automatically provisions Docker container and virtual machine registries for exclusive use by the organization. You can add developer users to your organization at anytime either during or after creating your organization.
You must create an organization upon logging onto the console for the first time. Additional organizations can be formed after that. Organization names must be all one word, with no spaces or special characters.
Note: It's best practice to keep the name of your organizations all in lower-case. There are sample files in our tutorials and workshops that require specifying organization names in lower-case to ensure your application uploads successfully to our registries. See Step 2 within the Deploying an Application to the EdgeXR platform guide for an example.
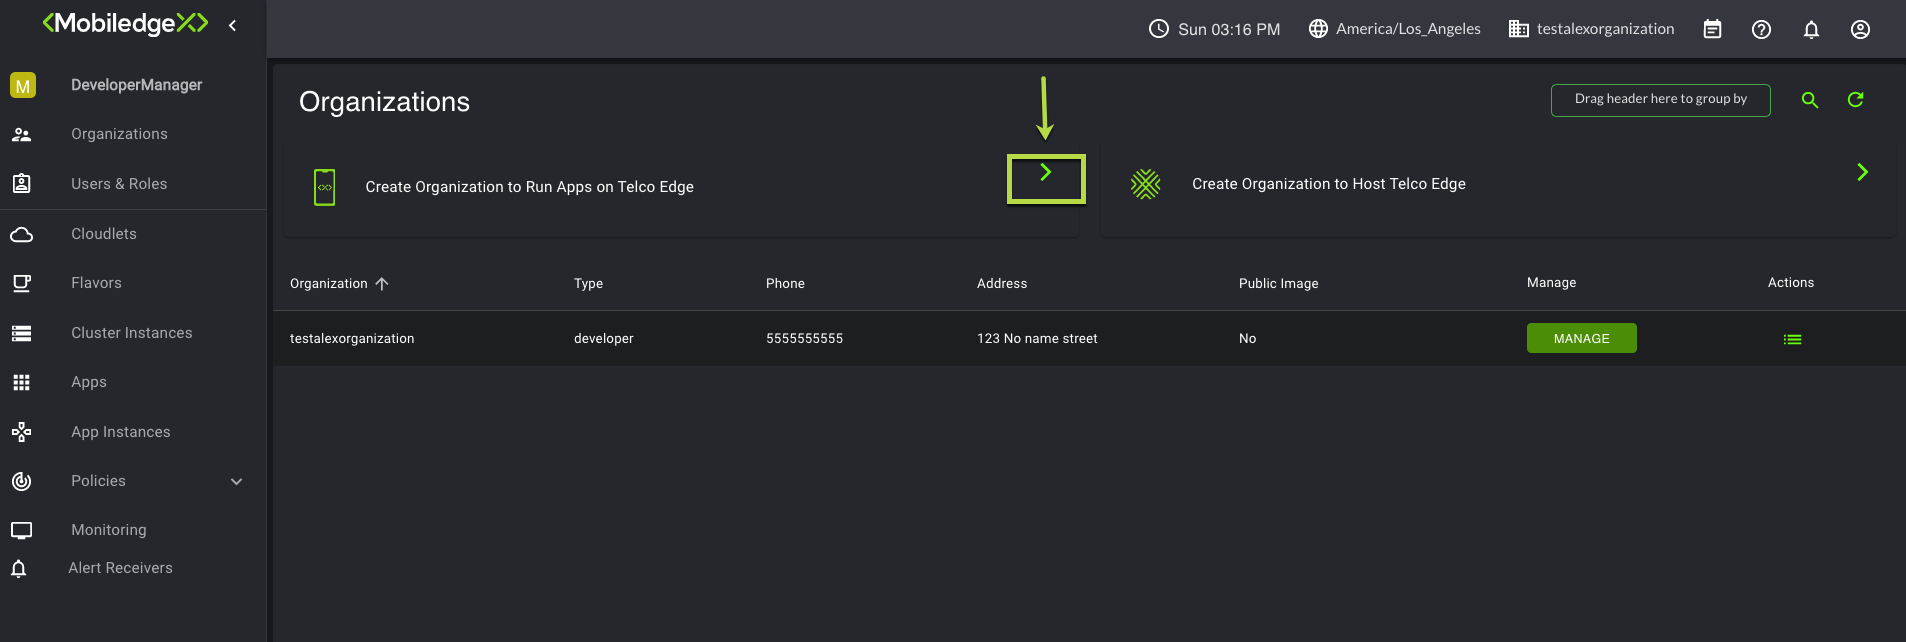
After logging onto the Edge-Cloud Console, the first screen that appears is the Organizations page. This screen is where you add your organizations and users(optional).
Create an Organization
1. From the Organizations screen, select the arrow next to Create Organization to Run Apps on Telco Edge.

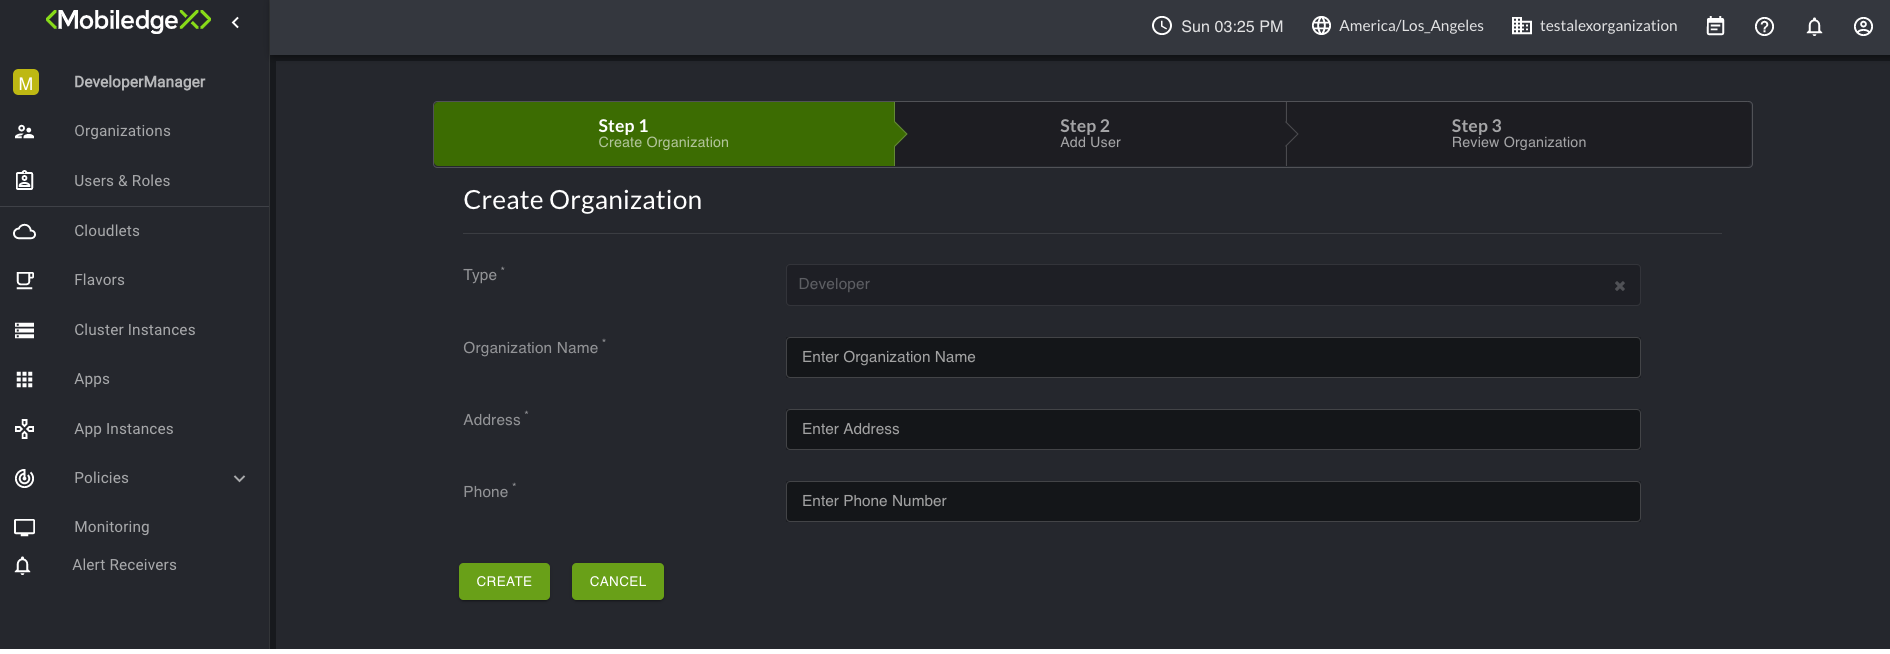
The Create Organization page opens.

2. For Organization Name, type in a name of your organization. Observe the naming convention rules as mentioned earlier.
3. Type in an address and phone number, and select Create. The Step 2 Add User page opens.

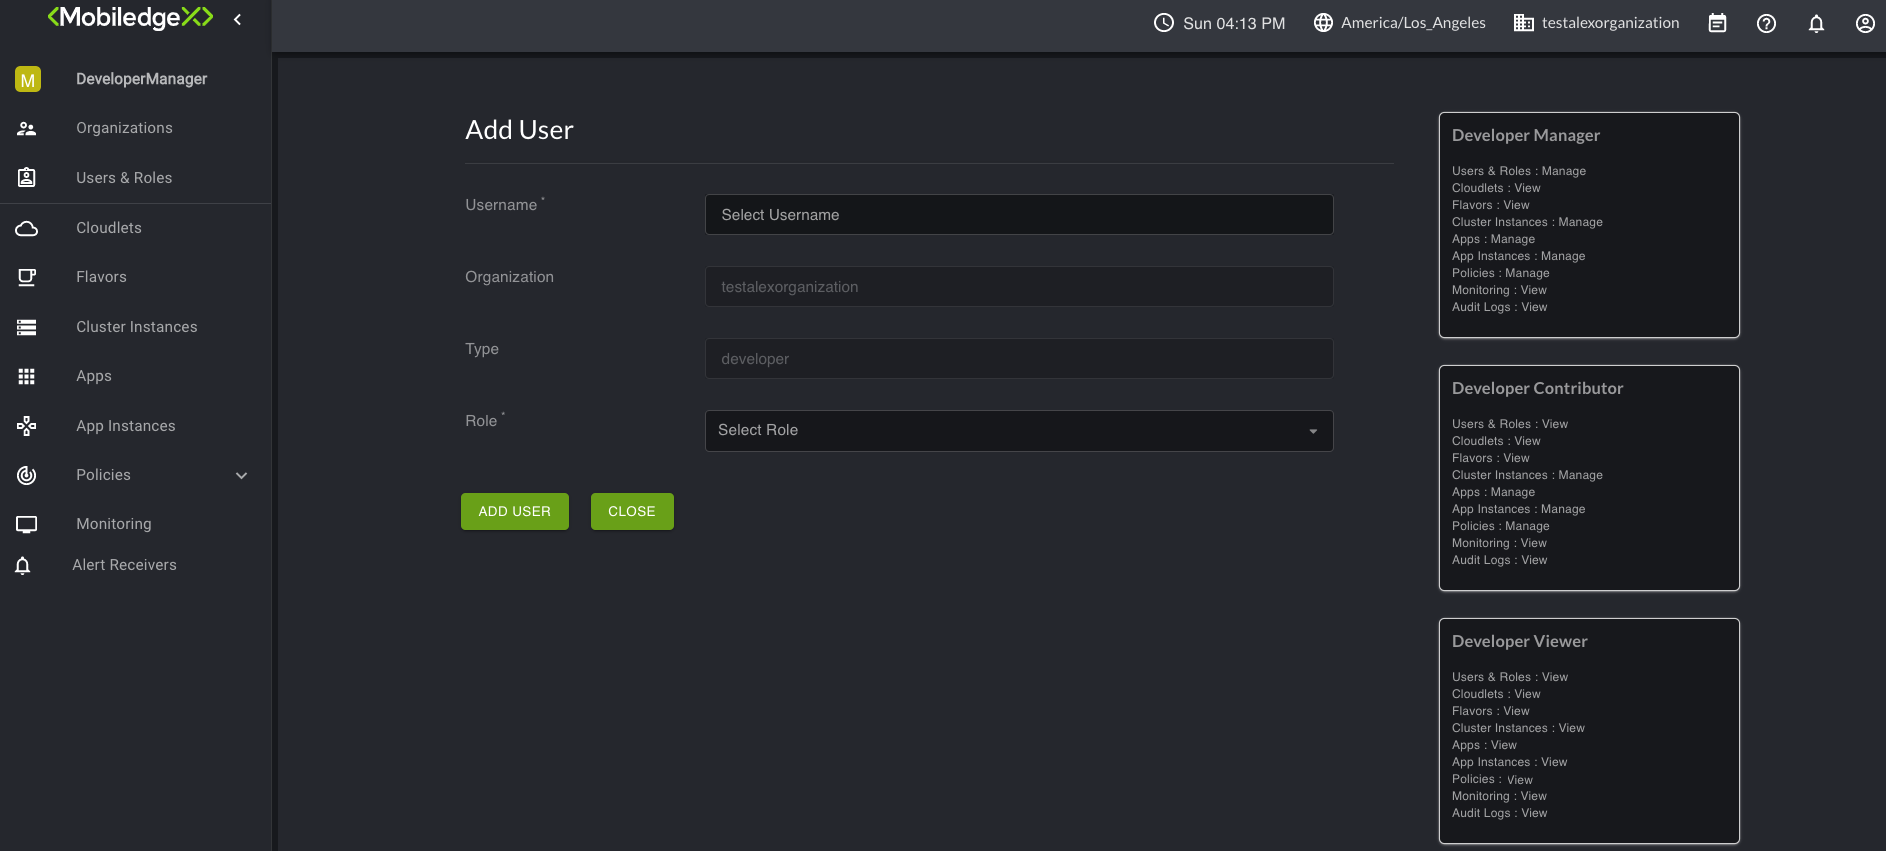
4. You can start adding your users and assign them roles, or skip this step and return to it later.
Note: The right-side of the screen lists the available roles you can assign your users. Select the role you wish to assign the user by selecting Select Role within the Role field to display the drop-down list.
5. Select Add User.
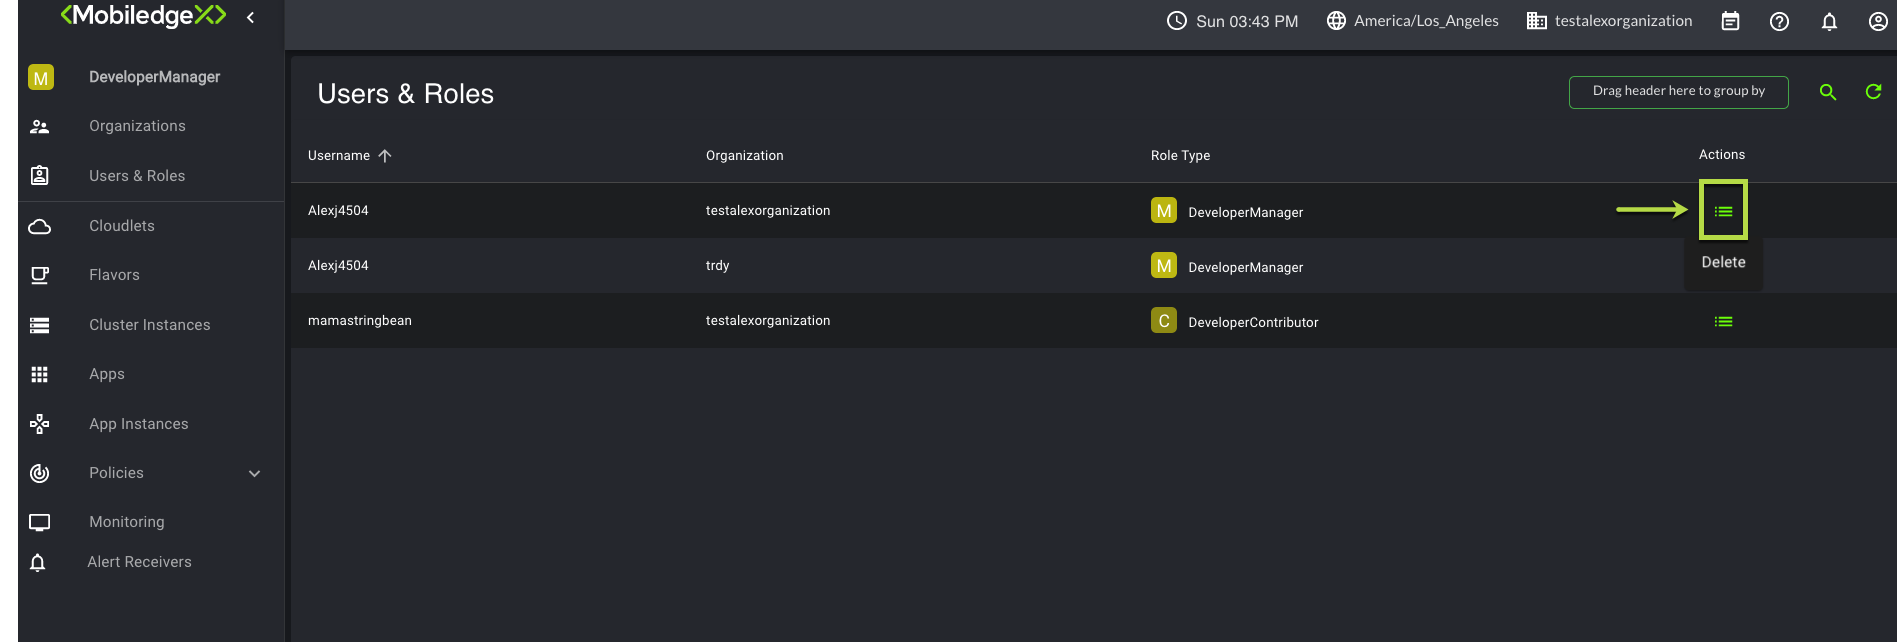
6. To confirm that your user(s) was added, navigate to the Users & Roles page.
Although your organization is listed, it's currently not managed. Select the Manage button associated with the organization you would like to manage. Remember to perform this step each time you log into the Edge-Cloud Console. Selecting the Manage button for your organization ensures you are working within the correct organization. Additionally, selecting Manage displays all the available pages on the left navigation. However, to expand or collapse the pages, select the icon as shown in the image below.
Next to the Manage button is an Actions page where you can perform such tasks such as Audit, Add User, Update and Delete your organization.

View Users & Roles
You can view users and their associated roles that were added to your organizations. The Users & Roles page lists all users, roles, and associated organizations they were assigned.
The following actions may be performed on this page:
On the Search bar, type in the first few letters of your search to filter your search.
To filter by group, simply drag and drop the Username, Organization, or Role Type header into the Drag header here to group by option.
From the Actions page, you can select the quick Actions icon and select Delete to delete the user from the organization.

Role-Based Access Control (RBAC)
Role-based access control provides varying levels of access specified by the user's role and responsibilities. Setting the user's roles and responsibilities requires establishing permissions and privileges, therefore, enabling access for authorized users. EdgeXR provides 3 different levels of RBAC with varying privileges, as outlined below. Note that specifying RBAC for each user are performed within the organization page.
Role | Manage | View |
|---|---|---|
Developer Manager | Users & Roles, Cluster Instances, Apps, App Instances, Policies, Cloudlet Pools | Cloudlets, Flavors, Monitoring, Audit Logs |
Developer Contributor | Cluster Instances, Apps, App Instances | Users & Roles, Cloudlets, Flavors, Monitoring, Audit Logs, Cloudlet Pools |
Developer Viewer | None | Users & Roles, Cloudlets, Flavors, Cluster Instances, Apps, App Instances, Policies, Monitoring, Audit Logs, Cloudlet Pools |
Sort and Filter
There are a number of UI pages that let you sort and filter by the headers available, such as region, organization, app, deployment types, and so forth. This feature is called group filtering. To filter the information displayed on your pages, select and drag any of your headings and drop it into the Drag header here to group by icon.
