Learn how to use our Matching Engine SDK for Android devices
Last Modified: 11/23/21
In this guide, we will be making use of a EdgeXR library: the EdgeXR MatchingEngine library exposes various services that EdgeXR offers such as finding the nearest EdgeXR Cloudlet for client-server communication or workload processing offload.
This library has been published to a Maven repository and we will be adding them to our workshop project. To download the code and read instructions on how to run it yourself, check out code on the EdgeXR Samples Github. In this tutorial, we'll show you the key bits of code necessary on how the sample integrates the EdgeXR Android SDK.
Prerequisites
A EdgeXR Console Account to access our SDKs on the EdgeXR Artifactory
Experience with Android app development.
Android Studio 4.2 installed or higher
A device with API v.23 or higher (Android 6.0)
Import the Android SDK Matching Engine Library
Within the Workshop Completed Sample, there is a build.gradle file that contains all the dependencies necessary for this sample Android app. Included within the build.gradle are the settings needed to pull the EdgeXR Android SDK from a Maven repository. If you are looking to use the EdgeXR SDK within this sample application, you will need to update the Artifactory credentials so that you will be able to get the latest version of the Android SDK. You can create and define these within the local.properties file, which is a file that will be created after you first open the project within Android Studio:
EdgeXR Usernamewith the username (not e-mail) used to login with the EdgeXR ConsoleMobiledgex Passwordwith the password used to login with the EdgeXR Console
sdk.dir=/Users/demouser/Library/Android/sdk
artifactory_user=[EdgeXR Username]
artifactory_password=[Mobiledgex Password]
Opening the Project in Android Studio
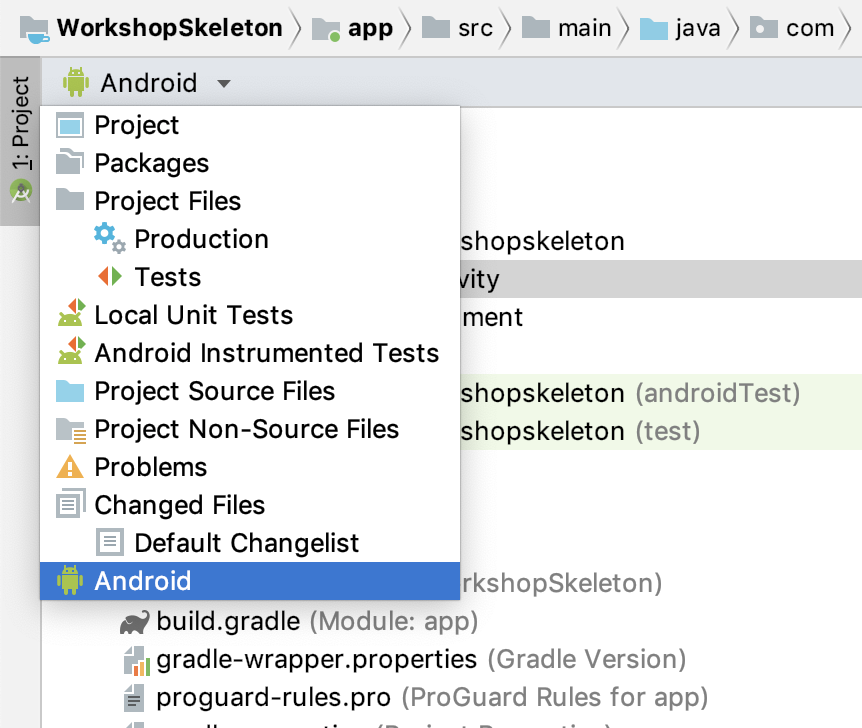
Once you have opened the Workshop Completed application within Android Studio, you will need to update the project so that it is in Android view. This will allow Android Studio to correctly read the project.

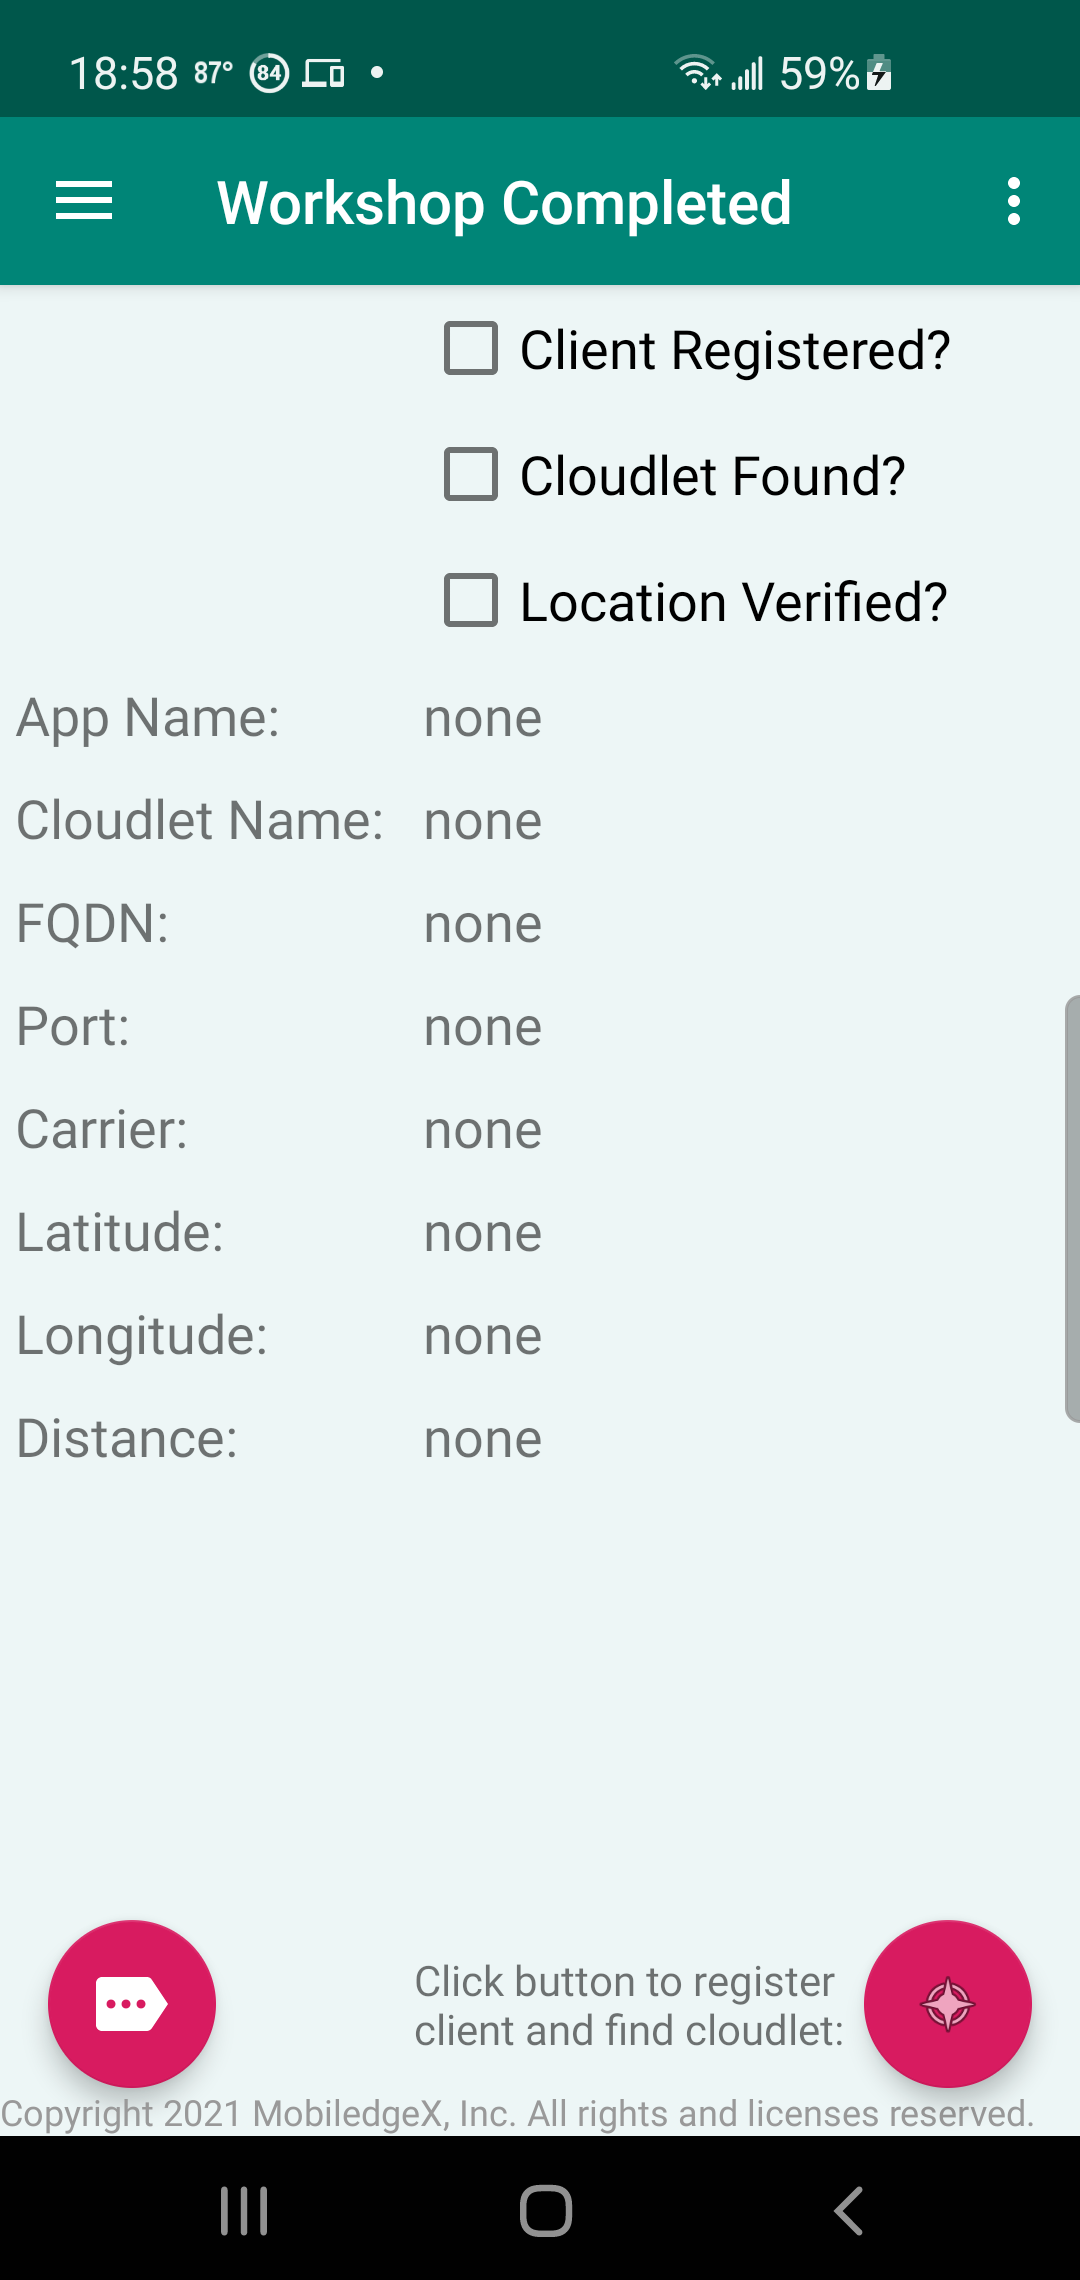
Once in Android View, you can verify that the project is working correctly by deploying it to your Android phone by selecting Run/Run App. Once the build completes and the app is deployed to your phone, you should see the EdgeXR Workshop running.

Project Dependencies
The EdgeXR SDK requires a few packages such as GRPC in order to successfully communicate with the EdgeXR Matching Engine API. In the Workshop Completed sample, this is declared within the app's build.gradle.
// Matching Engine SDK
implementation 'com.mobiledgex:matchingengine:3.0'
implementation 'com.mobiledgex:mel:1.0.11'
implementation "io.grpc:grpc-okhttp:${grpcVersion}"
implementation "io.grpc:grpc-stub:${grpcVersion}"
implementation "io.grpc:grpc-protobuf-lite:${grpcVersion}"
If you are changing versions or adding these packages for the first time, you will need to make sure you click Sync Now to pull in the newly added libraries.

Device Permissions
For the Workshop Completed Sample App, you will need to request a few different permissions which are mentioned within the AndroidManifest.xml.
This specific application runs an example of Face Detection and as such will require the mobile phone's camera in order to work sucessfully. Additionally the EdgeXR Android SDK requires the READPHONESTATE permission as well as a Location Permission (either ACCESSFINELOCATION or ACCESSCOARSELOCATION) in order to find the best edge instance of your application.
<uses-permission android:name="android.permission.READPHONESTATE" />
<uses-permission android:name="android.permission.CAMERA" />
<uses-feature android:name="android.hardware.camera" />
<uses-feature android:name="android.hardware.camera.autofocus" />
The app must explicitly ask the users for any special permissions. The Matching Engine SDK provides a utility to simplify this
com.mobiledgex.matchingengine.util.RequestPermissionsThis is used within the Main Activity of the sample.
mRpUtil = new RequestPermissions();
if (mRpUtil.getNeededPermissions(this).size() > 0) {
    mRpUtil.requestMultiplePermissions(this);
    return;
}
Android MatchingEngine SDK Intetgration
We will show how to use the EdgeXR Distributed Matching Engine APIs to register the user and find the optimal edge data center (cloudlet) running the app. To learn more about the workflow, you may refer to the SDK Technical Overview Documentation.
We will be showing the implementation for the following:
RegisterClient() - Identifies the user (Organization Name) and application details (appName and appVersion), and allows the usage of EdgeXR integration.
FindCloudlet() - Returns the edge application server to communicate with, in the form of an AppPort list that needs to be parsed to retrieve your particular application's server details. Either TCP or UDP transport. A cloudlet is a small-scale cloud datacenter.
Edge Events() - Listen for events and send updates about the client to the EdgeXR Distributed Matching Engine in order to determine the optimal time in your application workflow to switch to a better cloudlet for your end users.
Setup Matching Engine Parameters
First you will need to instantiate the MatchingEngine object, which is responsible for making the Matching Engine API calls.
matchingEngine = new MatchingEngine(ctx);
matchingEngine.setNetworkSwitchingEnabled(false);
To use the APIs, you will need to have deployed an application on the EdgeXR Platform at an edge cloudlet. For the purposes of this guide, you may use these credentials for the Workshop Completed app that leverages the Face Detection deployed as part of EdgeXR Samples.
appName = "ComputerVision";
appVersion = "2.2";
orgName = "EdgeXR-Samples";
Register Client
With the parameters specified above, we can make the first API call with the Matching Engine : RegisterClient. As the name implies, this registers the client Android device with the EdgeXR Matching Engine and confirms if that specified application, Computer Vision in this case, has been deployed to the edge. The request returns a Session Cookie in the RegisterClientReply that must be used for following API calls. This is the specific example code for making a Register Client Call.
AppClient.RegisterClientRequest registerClientRequest;
registerClientRequest = matchingEngine.createDefaultRegisterClientRequest(ctx, orgName)
	.setAppName(appName).setAppVers(appVersion)
	.setCarrierName(carrierName).build();
AppClient.RegisterClientReply registerStatus =
	matchingEngine.registerClient (registerClientRequest, host, port, 10000);
Find Cloudlet
After Registering the Client Device, we can now call the Find Cloudlet API, which is responsible for determining the best cloudlet that your application is deployed onto for the client, based on the GPS location and operator cellular connection. This is the specific example code for making a Find Cloudlet call.
AppClient.FindCloudletRequest findCloudletRequest;
findCloudletRequest = matchingEngine.createDefaultFindCloudletRequest(ctx, location)
	.setCarrierName(carrierName).build();
mClosestCloudlet = matchingEngine.findCloudlet(findCloudletRequest, host, port, 10000);
GetConnection workflow:
The GetConnection workflow is the suggested workflow to register the user using an application, find the nearest cloudlet with the application backend deployed, and get a “connection” object to send and receive data.
The full workflow is:
RegisterAndFindCloudlet(): Wrapper function for registerClient() and findCloudlet(). Returns a dictionary with findCloudletReply fields.
Get[Protocol]AppPorts(): Returns a dictionary (key: String, value: [String: Any]), where keys are the internal port specified on app deployment and values are the AppPort “object” returned in the ports field of findCloudletReply. (This object may contain a range of ports and an fqdn prefix that is specific to the application backend)
For your app, you should know what internal port is required and get the AppPort “object” from the dictionary that corresponds to that internal port. This returned AppPort object will then be used in the GetConnection call.
Get[Protocol]Connection(): Depending on the protocol (TCP, UDP, HTTP, Websockets), this will return a different Android object to be used to send and receive data.
In the FaceProcessorActivity, we provide an example of how you can implement the complete flow of Registering and Finding a Cloudlet to establishing a connection to that cloudlet with the GetConnection method. With this example, a TCP socket connection is established between the Android app and the Computer Application deployed on EdgeXR.
Future<AppClient.FindCloudletReply> future = me.registerAndFindCloudlet(this, orgName, appName, appVersion,  location, "", 0, "", "", null);AppClient.FindCloudletReply findCloudletReply;
try {
    findCloudletReply = future.get();
} catch (ExecutionException | InterruptedException e) {
    Log.e(TAG, "RegisterAndFindCloudlet error " + e.getMessage());
    return null;
}
HashMap<Integer, Appcommon.AppPort> portMap = appConnect.getTCPMap(findCloudletReply);
Appcommon.AppPort one = portMap.get(8008); // 8011 for persistent tcp
Future<Socket> fs = appConnect.getTcpSocket(findCloudletReply, one, one.getPublicPort(), 15000);
if (fs == null) {
Log.e(TAG, "Socket future didnt return anything");
return null;
}
Socket socket;
try {
socket = fs.get();
} catch (ExecutionException | InterruptedException e) {
Log.e(TAG, "Cannot get socket from future. Exception: " + e.getMessage());
return null;
}return socket;Edge Events
Edge Events allows your Android app to continuously send and get updates from EdgeXR in order for our platform to determine if there is a more suitable cloudlet for your client to connect to. To simplify integration, the Android SDK provides a Default Configuration method that you may utilize, that sets parameters for when your app would like to switch to a different cloudlet. To learn more about Edge Events, refer to your guide on Maintaining Optimal Connectivity to the Edge.
mEdgeEventsSubscriber = new EdgeEventsSubscriber(); me.getEdgeEventsBus().register(mEdgeEventsSubscriber);
// set a default config.
// There is also a parameterized version to further customize.
EdgeEventsConfig backgroundEdgeEventsConfig = me.createDefaultEdgeEventsConfig();
backgroundEdgeEventsConfig.latencyTestType = NetTest.TestType.CONNECT;
// This is the internal port, that has not been remapped to a public port for a particular appInst.
backgroundEdgeEventsConfig.latencyInternalPort = 3765; // 0 will grab first UDP port but will favor the first TCP port if found.
// Latency config. There is also a very similar location update config.
backgroundEdgeEventsConfig.latencyUpdateConfig.maxNumberOfUpdates = 0; // Default is 0, which means test forever.
backgroundEdgeEventsConfig.latencyUpdateConfig.updateIntervalSeconds = 7; // The default is 30.
backgroundEdgeEventsConfig.latencyThresholdTrigger = 186;
What's Next
- Computer Vision on EdgeXR
Learn how to deploy the Open Source EdgeXR Computer Vision service to an edge cloudlet - Face Detection Integration
Learn how to add Face Detection to the Workshop Completed App