EdgeXR Android Demo App
The EdgeXR Android Demo App allows you to learn about and experience the EdgeXR platform as a client connecting to one of our edge data centers, also called cloudlets, by demonstrating the API calls provided by the EdgeXR SDK. You can download the app from the Android Play Store.
Features
Display world map showing EdgeXR cloudlets where the app's backend is running
Allows calling individual EdgeXR APIs:
Register Client
Get App Instances
Find Closest Cloudlet
Cloudlet Latency Test
Cloudlet Download and Upload Speed Tests
GPS Spoofing Demo (see below)
Edge Events Config Editor (Settings)
Route Mode for demonstrating Edge Events
Computer Vision Demos
Face Detection
Face Recognition
Pose Detection
Object Detection
Cloudlet Map
The app's startup page is a world map showing EdgeXR cloudlets where the app's backend is running. If no cloudlets are shown, or you don't see the set cloudlets you expect to see, click the main menu hamburger icon and select Settings > General Settings. From here, select the Region and Operator Name you're interested in. Tap on any of the cloudlets, and a panel with the cloudlet's name will appear. On that panel, you can click on the panel to see cloudlet information like latitude, longitude, and distance from your location.
Cloudlet Details
In addition to showing the details of the cloudlet, this page allows the initiation of a latency test or download and upload speed tests. The settings of this page allow control of certain conditions, such as the number of packets for the latency test, or the size of the download. Select the gear icon to access these settings. You can also choose this cloudlet to be used as the Edge server for Face Detection and Face Recognition. Tap the 3-dot menu and select Use as Face Recognition Edge Host. The Cloud server can be configured in the same way.
SDK Functionality
Register Client
This will call the RegisterClientAPI with information that identifies this app's backend software. The session cookie is shown to verify that the call was successful.
Get App Instances
This will call the GetAppInstListAPI to find everywhere our backend is running, and will draw a cloudlet icon for every location found.
Find Closest Cloudlet
This will call the FindCloudletAPI with our current GPS coordinates to determine which cloudlet running our backend is the closest. That cloudlet icon will turn green, and a line will be drawn between the cloudlet and our location.
GPS Spoofing Demo
When you start the app, you will see your location on the map represented by a mobile phone icon. You can move the mobile phone icon by long-pressing on it and dragging it to a new location, or long-pressing anywhere on the map. When you release the icon, you will be presented with the option to Spoof GPS at this location.
If you select Spoof, this new location will be used for subsequent Find Closest Cloudlet calls. Tapping the mobile phone icon will display the distance from the actual location, and any result code available. Reset Location allows you to simulate your real location to be anywhere in the world, and you can verify that Find Closest Cloudlet finds the expected cloudlet.
Edge Events
See Edge Events Overview for more details on how Edge Events work.
This app can be used for testing different Edge Events configurations. If you don't change any settings, you will be using the default configuration, where all attributes have been set to common values. To override the defaults and create your own configuration, open the main menu, select Settings, then Matching Engine Settings and you will see this screen:
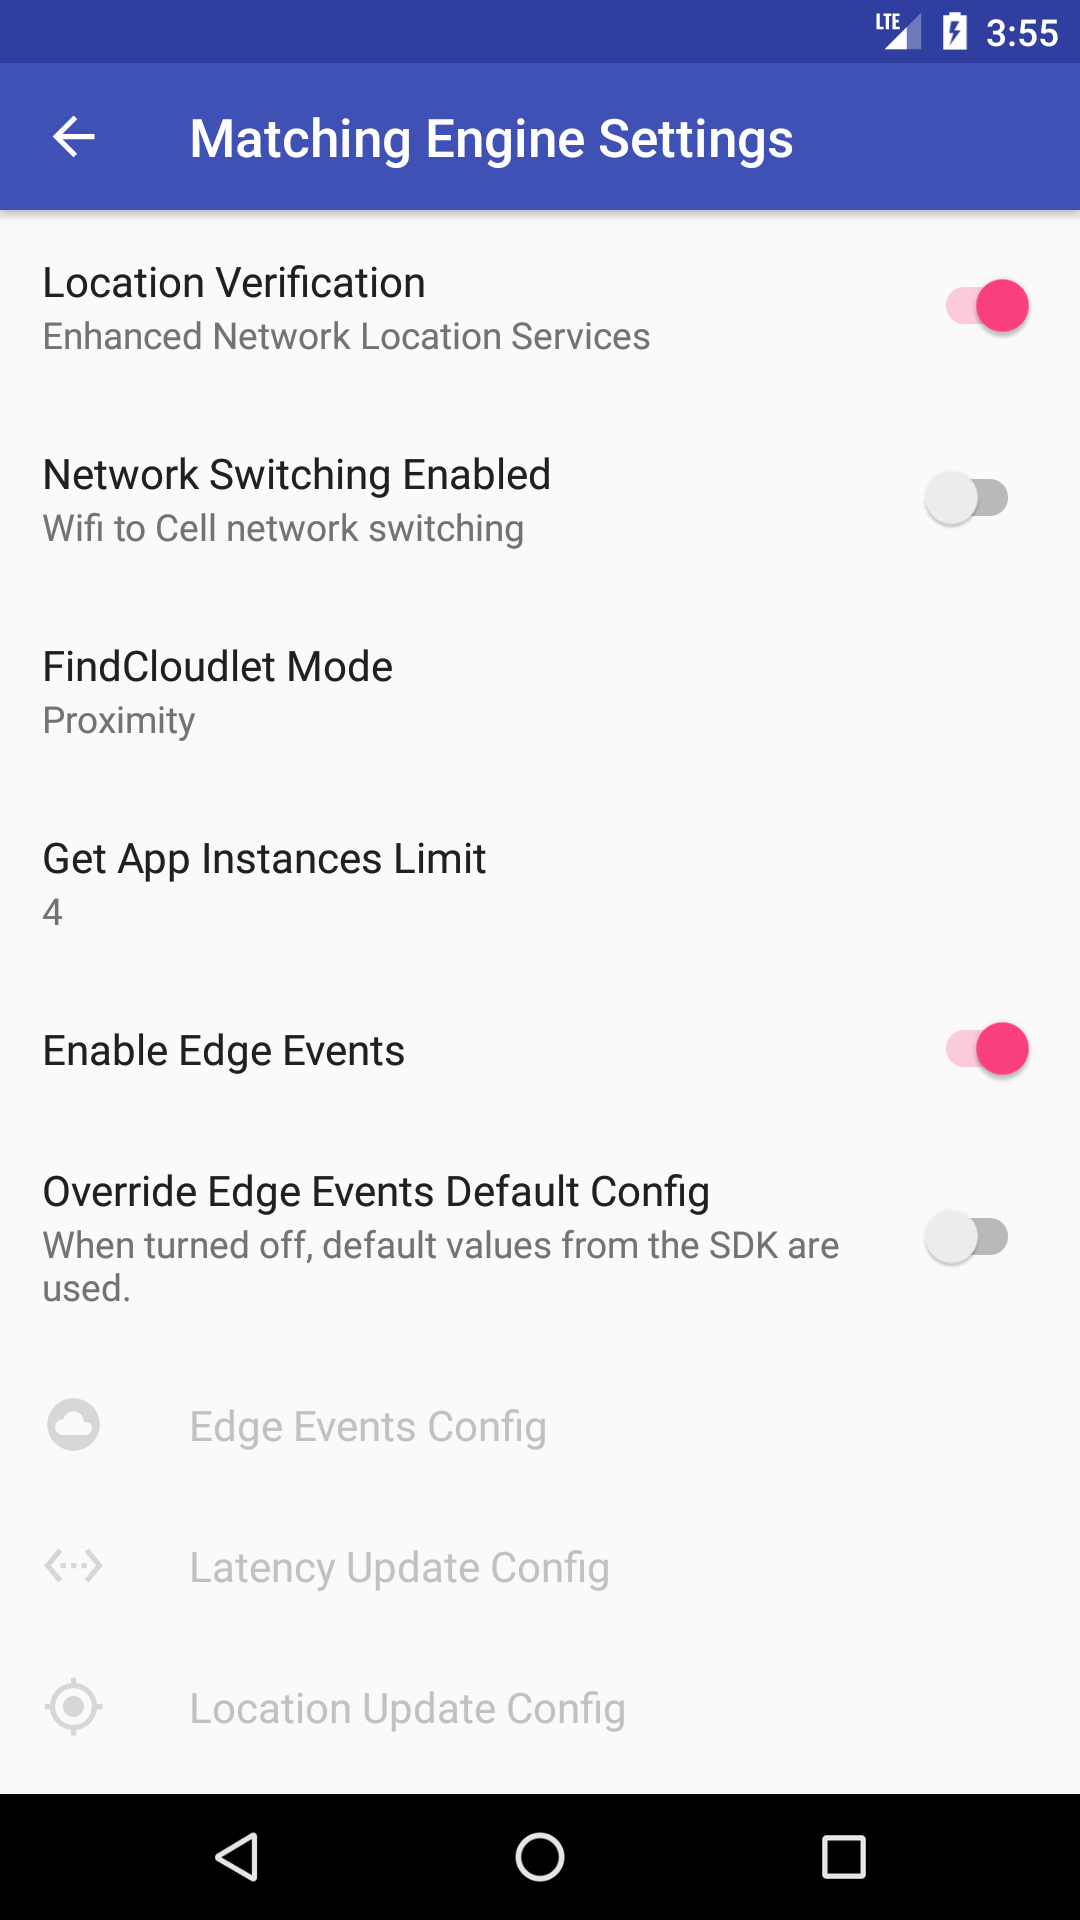
The Enable Edge Events toggle can be turned off if you wish to disable Edge Events. In this case, all Edge Events settings are grayed out and cannot be edited.
The initial setting for Override Default Configuration is off. In that case, default values that are populated by matchingEngine.createDefaultEdgeEventsConfig() will be used, and editing of the Edge Events Settings is disabled. If the override is switched on, then the items are enabled, and any of the values can be customized.
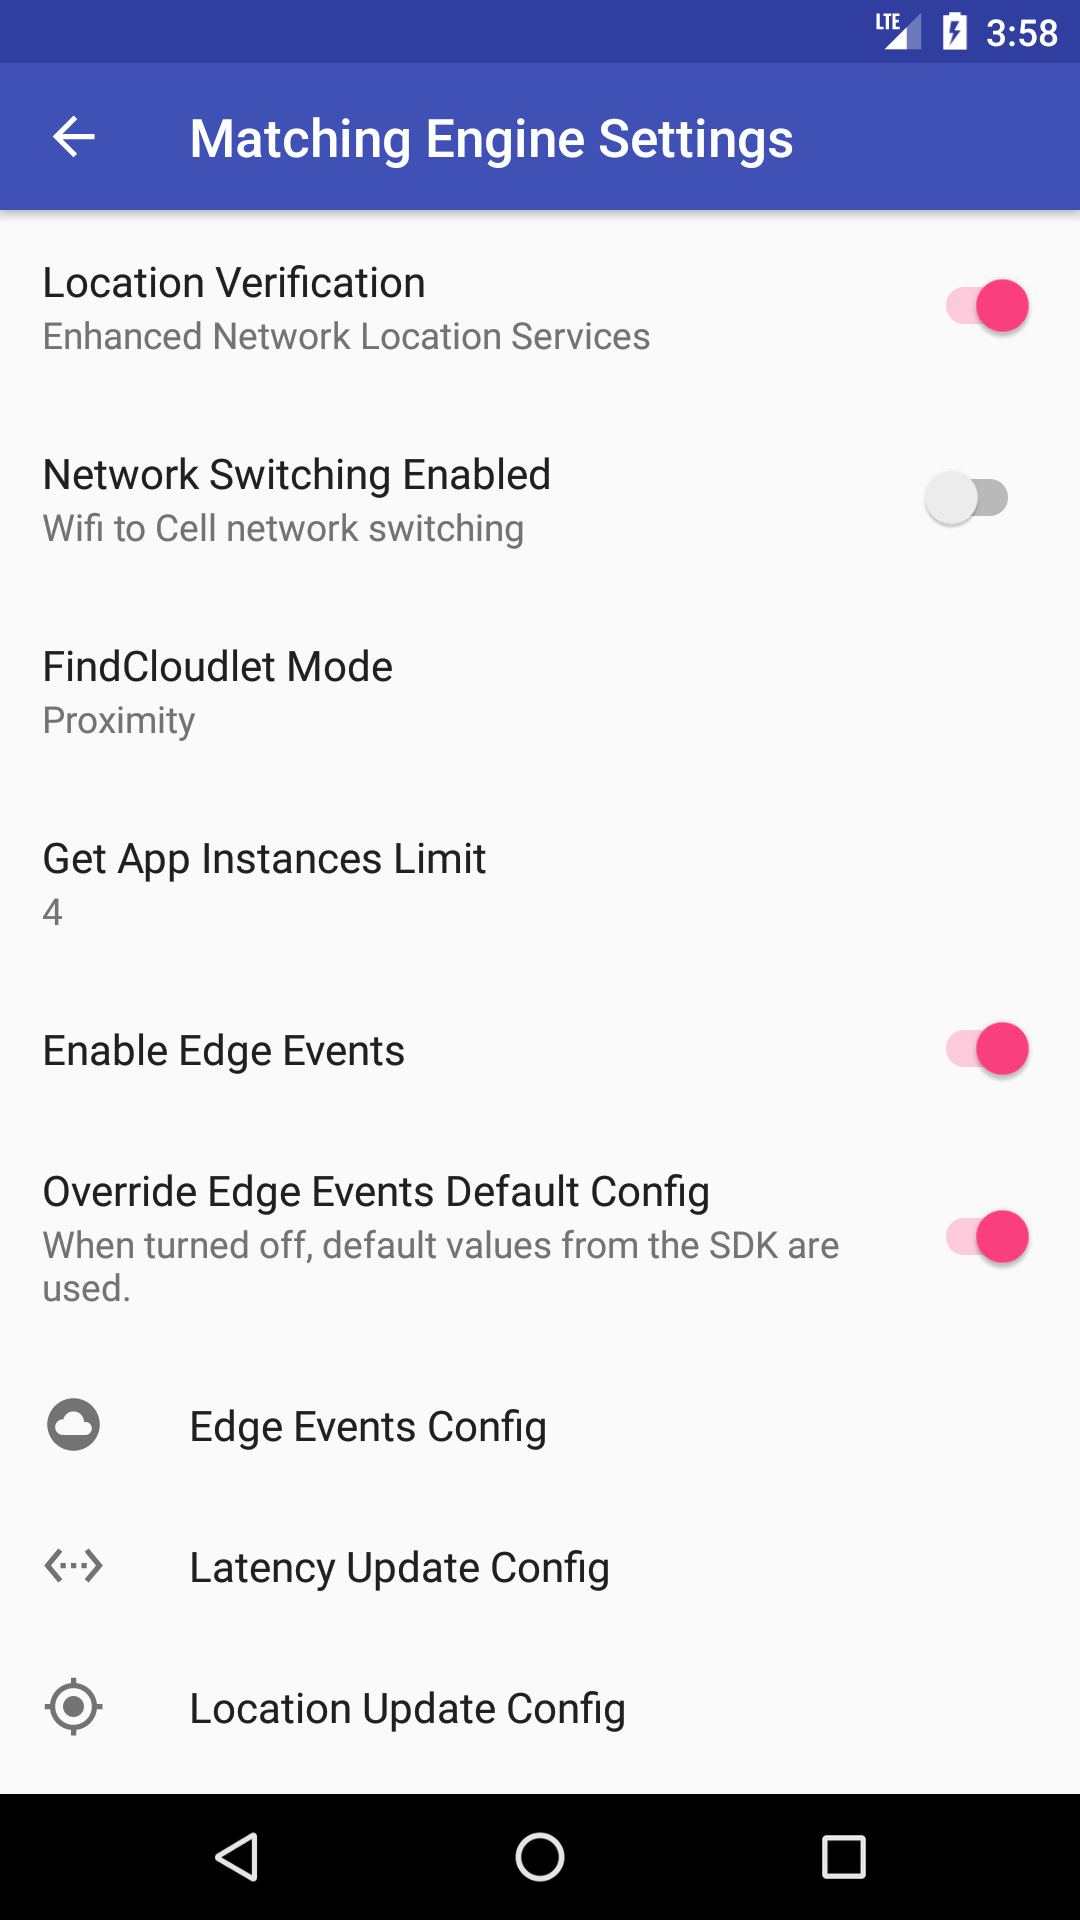
After turning on Override Default Configuration and selecting Edge Events Config, this screen is shown:
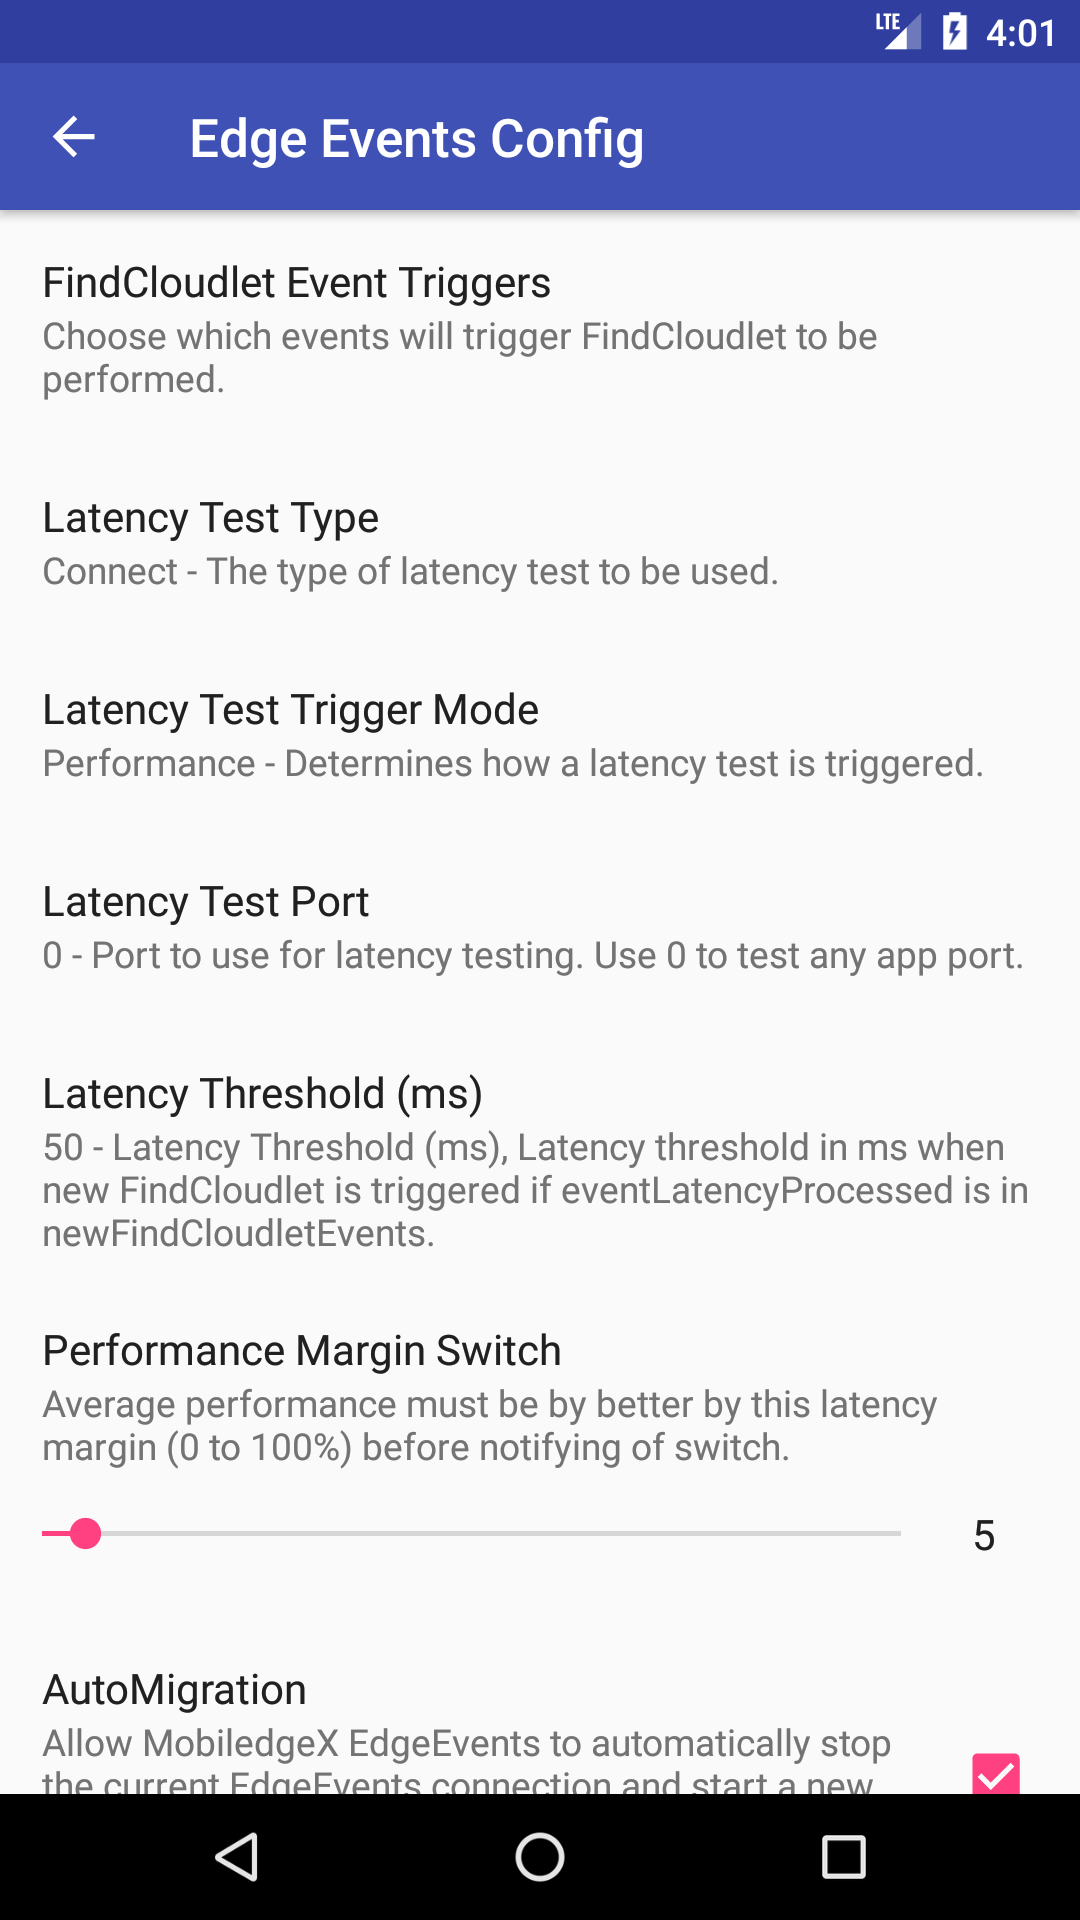
On first run, all items are populated with the original default values. Any edited settings are retained, even when turning Override off and back on.
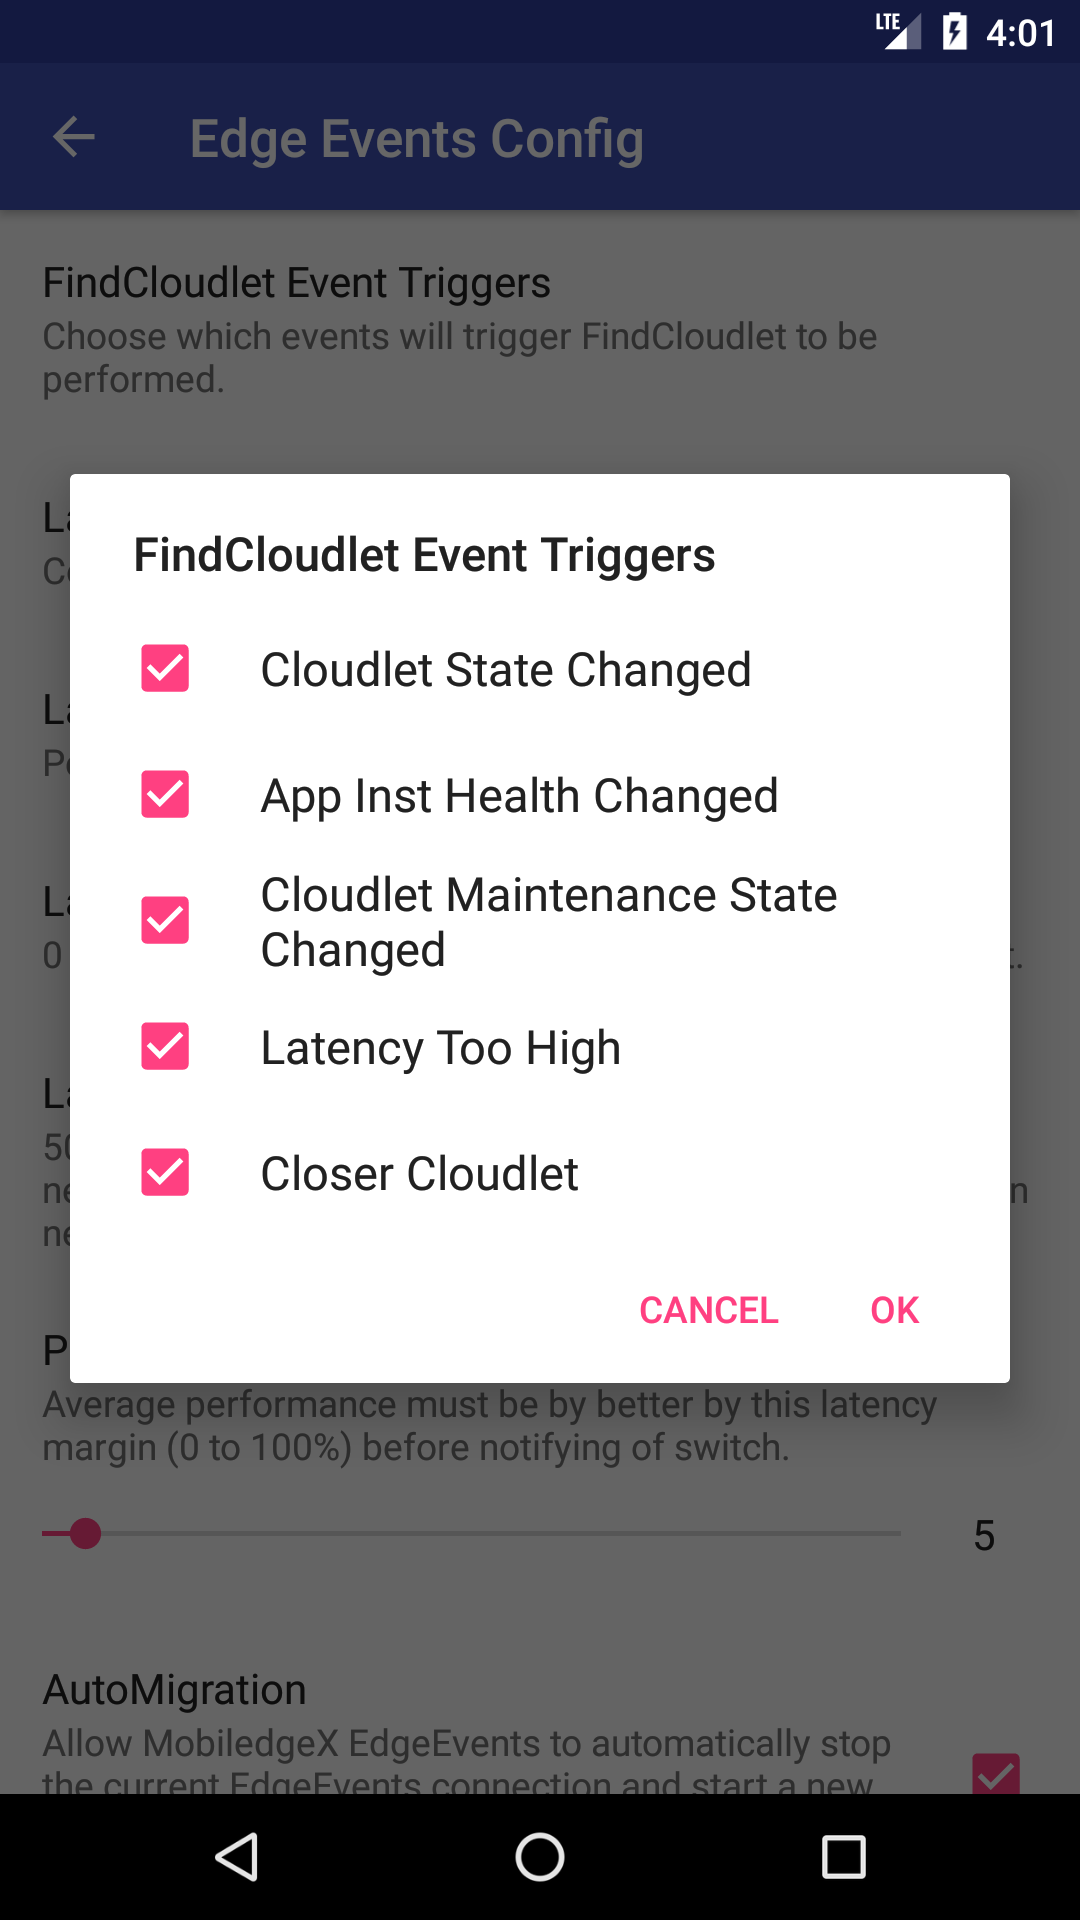
Selecting FindCloudlet Event Triggers displays this screen where the user can toggle individual triggers on or off:
Back on the Matching Engine Settings page, selecting Latency Update Config shows this screen:
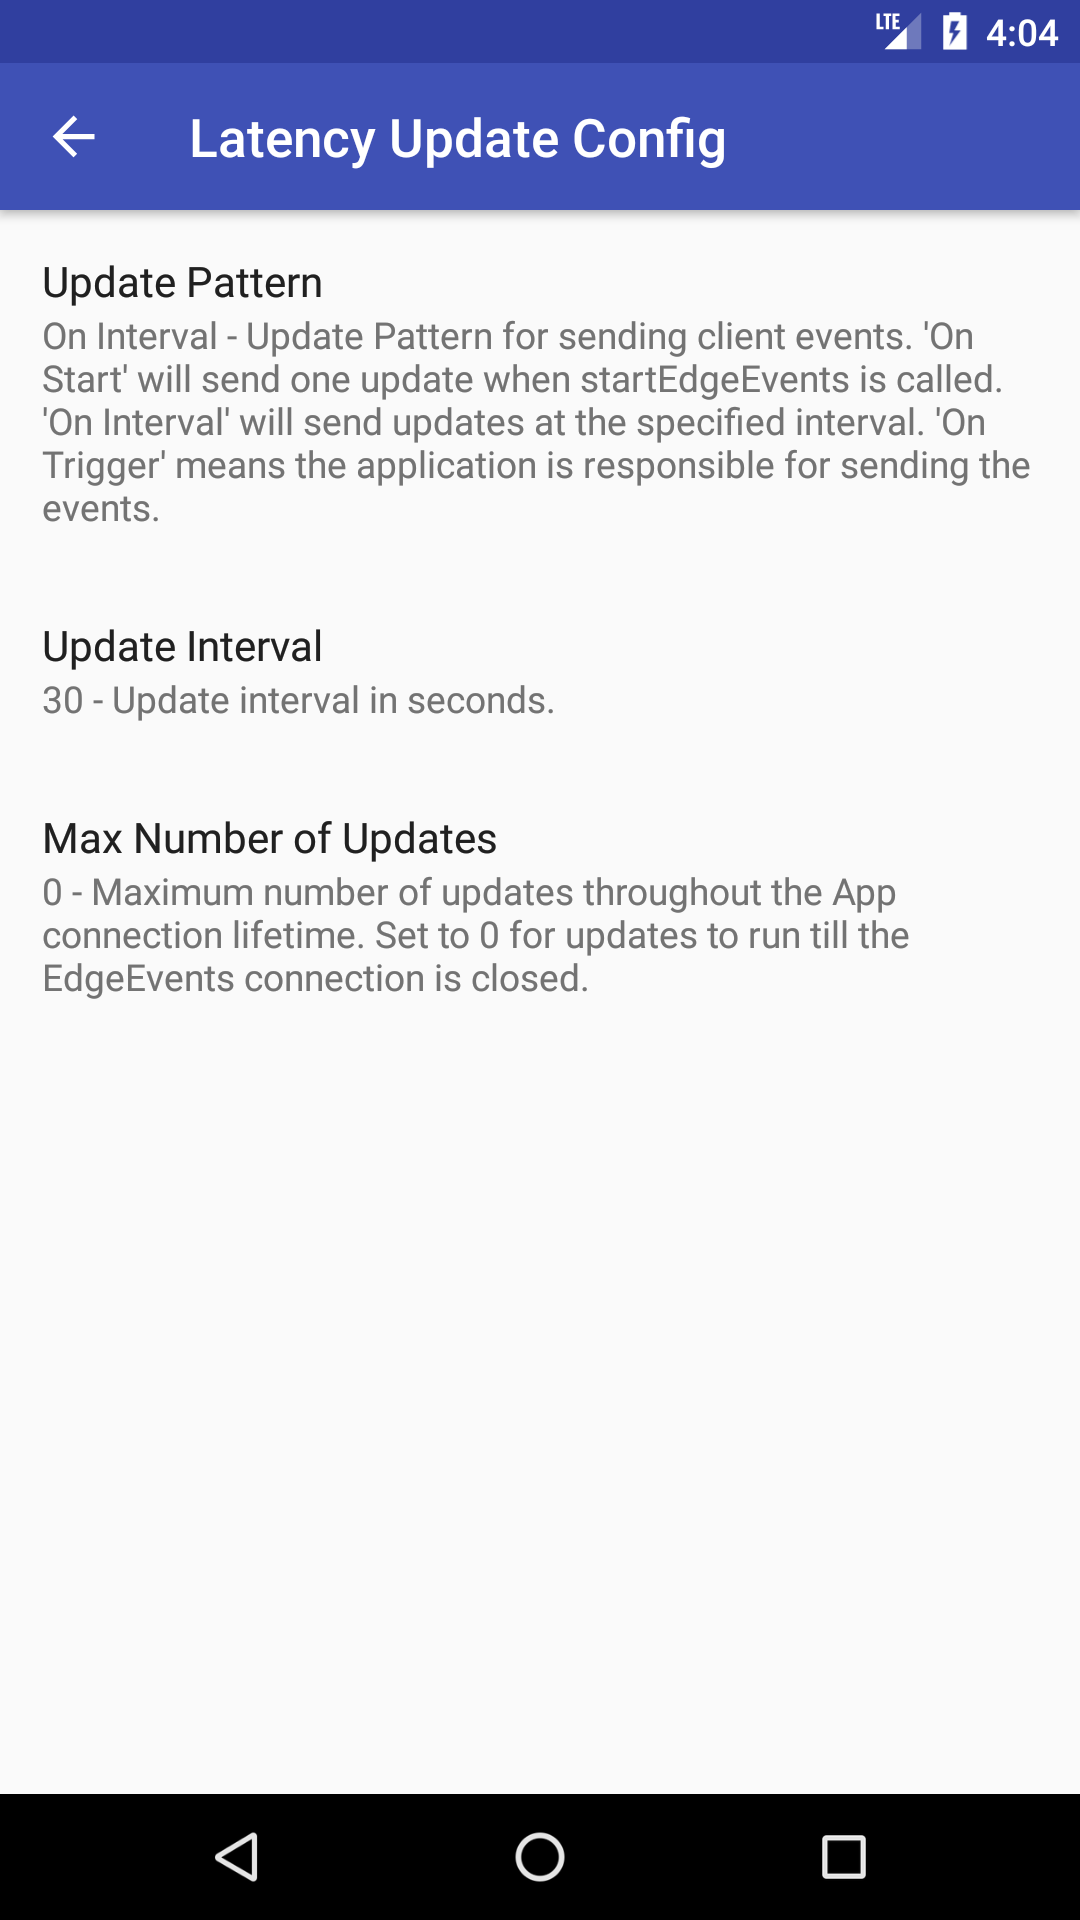
Selecting Update Pattern shows a list of values:
On Interval
On Start
On Trigger
If On Interval is selected, then Update Interval and Max Number of Updates settings are present and can be edited. Otherwise, they are removed from the screen.
The Location Update Config screen looks and behaves just like Latency Update Config.
Building the EdgeEventsConfig
Once the Settings screen is exited, if any applicable settings have been changed, the EdgeEventsConfig is rebuilt, starting with matchingEngine.createDefaultEdgeEventsConfig(). If Override Default Configuration has been switched on, all of the attributes are overridden with the values from preferences. Then the Edge Events connection is restarted to pick up the new configuration.
Testing Edge Events
Follow these steps to perform a basic test to verify that Edge Events are operating correctly:
Make sure Enable Edge Events is switched on.
Long press on the map in a location obviously closer to one cloudlet than another, then select Spoof GPS at this location.
From the 3-dot menu, select Find Closest Cloudlet.
Verify that the expected cloudlet is highlighted in green, marking it as the closest cloudlet.
Now spoof your location to a place closer to a different cloudlet.
Verify that the new closest cloudlet is automatically selected and highlighted.
Route Mode for Demonstrating Edge Events
The app can visualize how Edge Events are used to select a new app instance to connect to when a closer cloudlet is available due to proximity. For Edge Events to be initialized, Find Closest Cloudlet must be performed.
For best results, zoom in on the map so that the available cloudlets are nearly filling the screen, then Spoof GPS to a location near one of the cloudlets, then perform Find Closest Cloudlet.
From the 3-dot menu, select Route Mode > Driving.
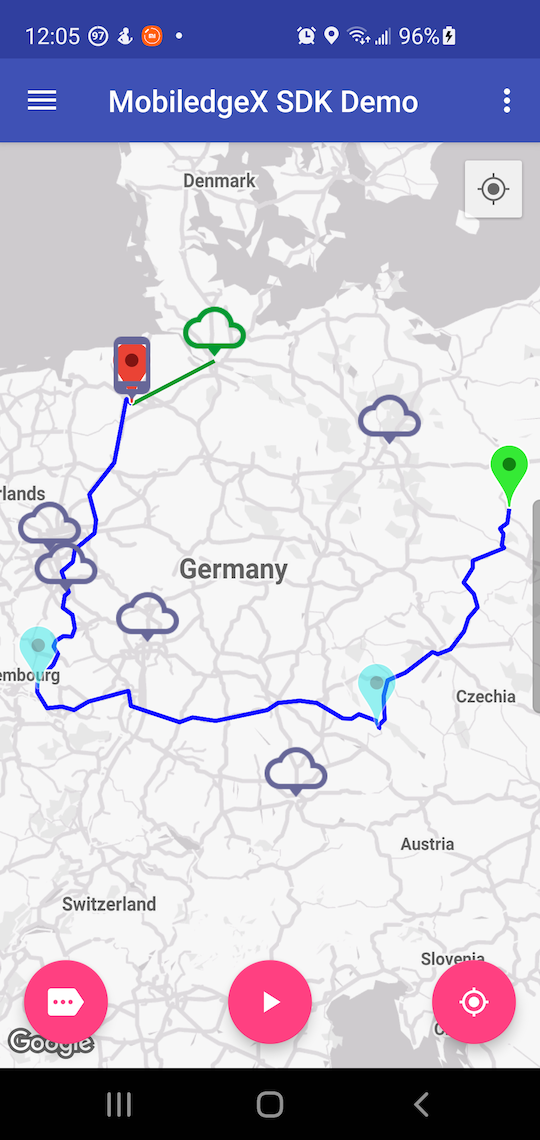
A green Start marker will be placed at the upper left of the map, and a red End marker will be at the lower right. A driving route will be drawn between the 2 points. If you see No driving route found, make sure both end points are on dry land.
Start and End markers can be long-pressed then dragged to new locations, and the route will be recalculated.
To place additional waypoints to alter the route, long-press on the map where you wish to place the waypoint. From the dialog, choose Add waypoint to route. The new route will be calculated from the Start marker through the waypoint and to the End point.
Repeat as desired. Waypoints can be moved to new locations just as the Start and End markers can.
When satisfied with your route, click the Play button at the bottom center of the screen.
The mobile icon will jump to the Start point and then start moving along the route. At one second intervals, the new mobile icon position is reported via the Edge Events connection. Whenever it is closer to a new cloudlet, Edge Events will inform the app of the new cloudlet info, and the app will perform a connection test, then mark the cloudlet in green and draw a connecting line.
Computer Vision Demos
Select one of the Detection or Recognition activities from the main menu. You can control several options, like which stats are displayed by selecting the gear icon to access Computer Vision Settings. Things to try:
You may switch between the front and rear camera by tapping the camera icon.
Tap the 3-dot menu, and select Play Video to process a canned video instead of images from the camera. This function is useful for unattended demos or benchmarking.
Go to Settings and turn on Show Latency Stats after session to get a stats summary that can be copy/pasted for additional use.
Face Detection
The Face Detection activity provides a visual comparison of the latency offered by an Edge cloudlet vs. that of a server in the public cloud. The Edge cloudlet can be determined in a few ways, in this order of priority:
The result of Find Closest Cloudlet, if performed.
Selected from within the Cloudlet Details page options menu. This also activates the Override Edge cloudlet hostname value in Computer Vision Settings.
Edge Server entry in the Computer Vision Settings, if updated by the user.
The default hostname from the provisioning data at https://storage.googleapis.com/downloads.edgexr.org/opencv/cvprovisioning.json. Images from the camera are sent to a server that uses OpenCV to detect faces in the image. The server returns coordinates of any faces, and the app renders rectangles around them.
Face Recognition
Face Recognition is similar, but instead of only detecting the presence of a face in an image, the name of the subject will also be returned if the person is part of the training data. To add your face to the training data, tap the 3-dot menu, and select Training Mode. You must be signed in to your Google account via the main menu so that your name can be associated with the face images. Guest Training Mode is also available to add images of another person, whose name you must enter. You own your images and any guest images you add, and you can remove them at any time, by selecting the appropriate menu entry. For Face Recognition, only a single face is supported at a time. If more than one face appears in the given image, only one of them will be detected and recognized.
Object Detection
Object Detection uses PyTorch on a GPU-enabled cloudlet to detect objects in images sent from the camera to the ComputerVision app instance. The server processes the image, and for every object detected, returns coordinates of the bounding rectangle, the class name of the object, and the confidence level. This data is rendered as an overlay over the camera preview image.
Pose Detection
Pose Detection uses OpenPose on a GPU-enabled cloudlet to detect the pose of human bodies. Like the other activities, images from the camera are sent to the cloudlet for processing. Instead of rectangular coordinates, points representing the bones of the pose(s) are received and rendered. There is no Edge/Cloud comparison for this activity. A single cloudlet is used for image processing. Note that Pose Detection does not use the result of Find Closest Cloudlet because there are a limited number of GPU-enabled cloudlets available.